Netbeans is one of the main free Java editors in the market. In fact, it can be used to program in many other computer languages, like C/C++, Ajax, Javascript... Netbeans can be extended adding modules that add new features. So you can have a programming editor customized to your needs.
This tutorial can be of interest for all those who want to create a module that adds support for a new language inside Netbeans IDE.
The process of creating the first of the modules that compose my X3DV Module Suite was similar to the one described here.
We will learn how to make a module that has these features:
- Syntax highlighting that is specific for the language we will define.
- Brace completion and auto-indentation.
- Icons for the new files of that language.
- To be able to create new files written in our new language.
- Template for the new files written in that language.
First Steps With Your Module
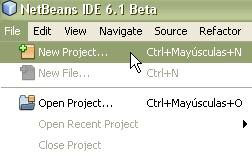
Create a new Netbeans project:
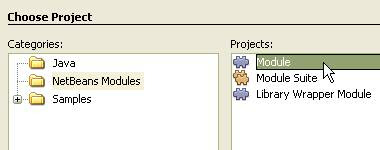
Choose Netbeans Modules in Categories and Module in Projects:
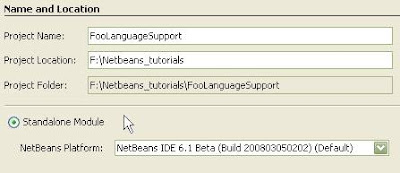
Fill in your project Name, locate the directory where its project folder will be placed, and mark it as a Standalone Module.
Fill the info for your module. You just have to fill the two first text boxes: change the Code Name Base to what is appropriate for your module and choose a Display Name.

The project will be created. Now we will add the basic: support files for the new file type.
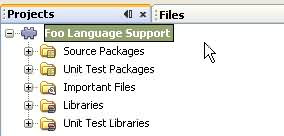
New File Type Support
Over the project name, right click and select New/File Type:
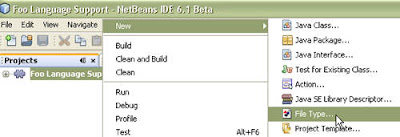
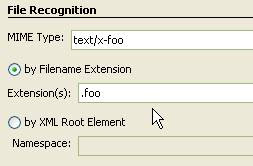
In the dialog that appears, you must enter some data so the Netbeans IDE recognizes the new file type.
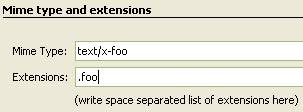
In MIME Type you must enter text/x- usually followed by the main extension of the file type.
Why does it say text/x-? As you may note, what you enter is not the true MIME type. For the IDE, all the extensions we create are text files.
In Extension(s) you must enter them separated with spaces. In our example, there's only one extensions for Foo Files: .foo
In Class Name Prefix, you enter the name of the file type, so all classes generated by the IDE for this module will start with it.
In Icon, you must locate in your hard drive a gif icon of 16x16 pixels. In our example, it's this:

Although in some tutorials they say that jpg and png images can also be used, I found that sometimes they're not displayed. So I recommend using gif images, as they are less error-prone.
The IDE will copy your icon to the project directory.

At this point, a bunch of files will be created by Netbeans IDE and opened in the code editor. Close them all, you don't need to edit them.
Now our module is ready to recognize and create the new file types. But we want the new files to have a default content. So we will edit the generated template. Locate the file named:

Edit it and write the content that you want to be the default when you create a new file.

Locate the XML Layer in the module. The XML Layer file is the soul of our module. It controls most of the things that a module can do.

Locate these lines:
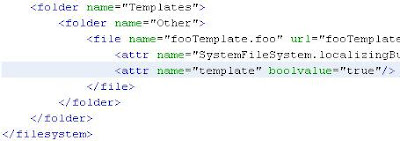 The next step if to create a description of the new supported file type that will be displayed when you want to create it, in the New File Wizard. This description will be stored in a file called "Description.html" (strange... uh?).
Add this line after the one highlighted in blue, modifying it to your project url:
foolanguagesupport/Description.html"/>
This line we added describes where the Description of the new file is. Right click over your project and select New/Other. Select Other/HTML file.

Name the file "Description", and leave the rest as it is.

Replace all the contents of the generated file with this:
Transitional//EN">
<html>
<head>
<title></title>
</head>
<body>
Creates a foo file that is useful
for nothing at all.
</body>
</html>
This is what we will see as a result of these steps once the module is finished and we want to create a Foo file.

Create the Language Support
Now that we have the new files recognized, we will add syntax coloring and other features to our language module.
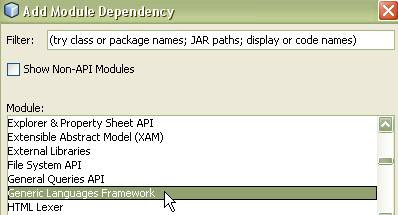
To be able to support language features, we must do the following: right click over your project and choose "Properties". The properties of your module will be displayed. Click over libraries (on the left) and then the "Add..." button.

In the list, search for the entry called "Generic Languages Framework", and add it.
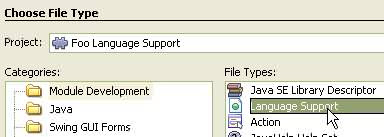
Now, right click over your project and select New/Other.
In Categories, select "Module Development", and on the right, select "Language Support".
Then enter the MIME Type and Extensions as we did in the first section of our tutorial.
You will see that the XML Layer has changed and now has more things added. Between them, there's a new file that describes our language. That file is called "language.nbs".
As the XML Layer has been modified, the icon of our files may have disappeared, so we need to add something to the XML Layer file to recover it.
Close all the opened files. Locate the file called XML Layer, and open it. Locate the line highlighted in blue in this image, that says
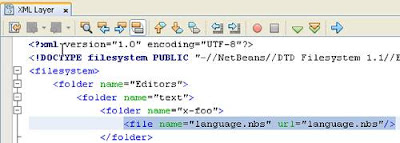
And replace that entire line with:
<attr name ="icon" stringvalue=
"org/yourorghere/foolanguagesupport/foo_gif.gif"/>
</file>
Editing The Language File
The default language.nbs file is filled with contents that may be a good start point for a scripting language. For declarative languages like VRML or X3D, or markup languages like HTML or similar, these contents are not useful.
In our example of the Foo Language, we will use a very simple language definition. This way you will understand the basics of defining languages.
So delete all the contents of the file language.nbs, and replace them with this:
# and open the template in the editor.
# definition of tokens
TOKEN:header:( "# foo language v1.0"
)
TOKEN:line_comment: ( "#"[^ "\n" "\r"]* |
"//"[^ "\n" "\r"]* )
TOKEN:keyword:(
"foo_function" |
"foo_command"
)
TOKEN:field:(
"foo_value"
)
# all that follows is useful for mostly all languages
TOKEN:identifier: ( ["a"-"z" "A"-"Z"]
["a"-"z" "A"-"Z" "0"-"9" "_"]* )
TOKEN:number: (["0"-"9"]*)
TOKEN:operator: (
":" | "*" | "?" | "+" | "-" | "[" | "]" |
"<" | ">" |
"^" | "|" | "{" | "}" | "(" | ")" |
"," | "=" | ";" |
"." | "$"
)
TOKEN:string:(
"\""
(
[^ "\"" "\\" "\r" "\n"] |
("\\" ["r" "n" "t" "\\" "\'" "\""]) |
("\\" "u" ["0"-"9" "a"-"f" "A"-"F"]
["0"-"9" "a"-"f" "A"-"F"]
["0"-"9" "a"-"f" "A"-"F"]
["0"-"9" "a"-"f" "A"-"F"])
)*
"\""
)
TOKEN:string:(
"\'"
(
[^ "\'" "\\" "\r" "\n"] |
("\\" ["r" "n" "t" "\\" "\'" "\""]) |
("\\" "u" ["0"-"9" "a"-"f" "A"-"F"]
["0"-"9" "a"-"f" "A"-"F"]
["0"-"9" "a"-"f" "A"-"F"]
["0"-"9" "a"-"f" "A"-"F"])
)*
"\'"
)
TOKEN:whitespace:( [" " "\t" "\n" "\r"]+ )
# colors
COLOR:header:{
foreground_color:"orange";
background_color:"black";
font_type:"bold";
}
COLOR:line_comment:{
foreground_color:"#969696";
}
COLOR:keyword:{
foreground_color:"red";
font_type:"bold";
}
COLOR:field:{
foreground_color:"#25A613";
font_type:"bold";
}
# parser should ignore whitespaces
SKIP:whitespace
# brace completion
COMPLETE "{:}"
COMPLETE "(:)"
COMPLETE "\":\""
COMPLETE "\':\'"
# brace matching
BRACE "{:}"
BRACE "(:)"
# indentation support
INDENT "{:}"
INDENT "(:)"
Now, create a Foo file, using a plain text editor, and save it with the extension .foo
These will be its contents:
# comment
// another comment
foo_function {
foo_command ( foo_value 1 0 1 );
}
)
TOKEN:keyword:(
"foo_function" |
"foo_command"
)
The Tokens are the words that are part of your language, and you want them colored. They define types of words that have something in common in your language. You group them into a category, that is a token.
The words are between double quotes, and separated by a | sign.
foreground_color:"orange";
background_color:"black";
font_type:"bold";
}
COLOR:line_comment:{
foreground_color:"#969696";
}
COMPLETE "{:}"
BRACE "{:}"
# indentation support
INDENT "{:}"
This sentences make that when you place the caret over a brace, the matching brace will be highlighted, and that lines after those signs will be indented.
Final Note
Now you know all that is needed to create the basic support for a new file type and language syntax highlighting.
You can add anything you like to your module, that you think is important for you and that could make your work easier.
There's much more than can be done with Netbeans IDE. I invite just to test it, join its huge community of users, and experience it by yourself.
Recommendations
According to the top web site development Chronicle, the only feature that has changed the entire concept of web marketing, is the advent of pay per click. Although web design contributes too, as well as the broadband quality, but nothing is like ppc.
© by Jordi R. Cardona. Link to this post without copying the text.
If you liked this post, get updates of Hiperia3D News for FREE


 Hiperia3D News is a Netbeans Community Partner, in recognition for developing the


8 comments
Very cool!
Thank you Geertjan!
Great tutorial...
I am starting with netbeans integrating a c/c++ toolchain for embedded development. It was very usefull... Thanks
Jesús
Thanks Jesus, this is great
Hi Jordi,
Thanks for the tutorial, it was very helpful.
Do you know how to define the .nbs syntax for keyword tokens in a case insensitive language, like SQL? For example in SQL a user could type 'select', 'SELECT', or even 'Select'.
Regards, Nick
I think that you must add a i after the token, for example:
"ab"i
this makes valid Ab aB AB or ab.
Try it.
http://wiki.netbeans.org/SchliemannNBSLanguageDescription
thanks a bunch,
you really got me goin on editing some classic asp files in netbeans.
You left out a really obvious step for a noob like me.
That is click on the project and hit "create .nbm" .
And then go to plugns ->downloaded files and install.
Your tut. makes it sound like it just autoinstalls.
Thanks,
Oh yes, I missed that. You must generate the .nbm files, that are in fact the modules themselves
Post a Comment